
Main Courses
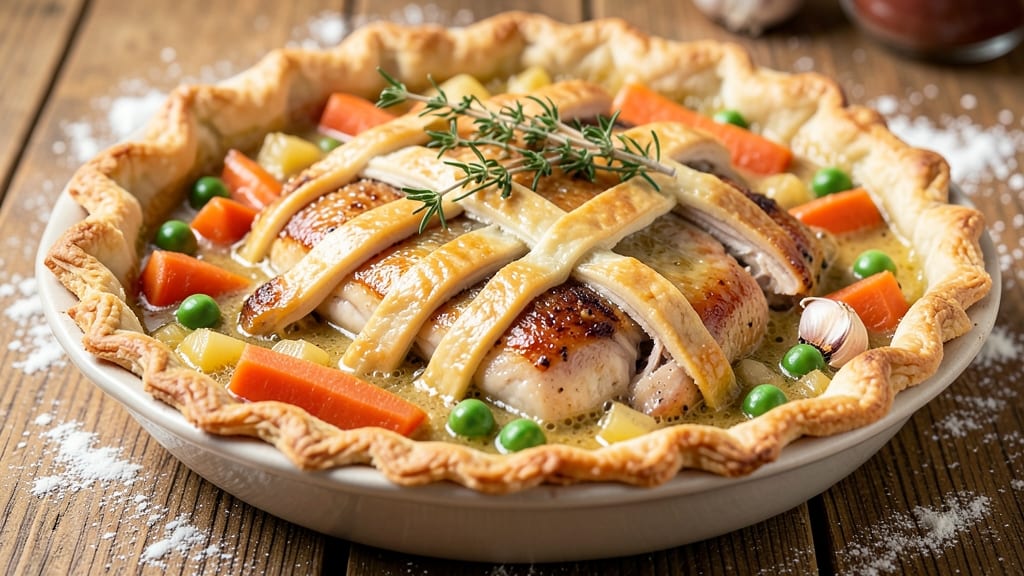
This authentic chicken pot pie recipe delivers the comforting embrace of childhood dinner tables with every golden, flaky bite. 💛 The secret lies in a rich filling of tender chicken, seasonal vegetables, and velvety broth—all nestled beneath a crisp, buttery crust that seals in every savory note.
I’ve perfected this version after years of testing, ensuring the crust stays perfectly flaky while the filling remains impossibly tender.
The magic begins with a well-seasoned filling—juicy chicken thighs (never breasts, they dry out), carrots, peas, and onions simmered until the flavors meld into a harmonious broth.
A touch of cornstarch thickens the mixture just enough to create that signature dumpling-like texture, while thyme and bay leaves add depth without overpowering. The crust, made from scratch with cold butter and all-purpose flour, gets the blind-baking treatment for a golden, shatteringly crisp finish.
What you’ll end up with is a pie that looks like it came straight from a family recipe book—golden-brown edges, a lattice crust option for elegance, and filling so rich it practically melts in your mouth.
The aroma alone will have everyone gathering around the table, and the first bite delivers on that nostalgic promise of warmth and comfort. This is the kind of dish that turns ordinary weeknights into something special.
Serve with a crisp white wine or a steaming cup of chamomile tea to complete the experience. The leftovers? Even better the next day, if you can resist eating the whole pie in one sitting. Let’s get started on creating this timeless classic.
Ingredients for authentic chicken pot pie
Golden crust, tender filling—just 15 ingredients for comfort food perfection.
| Ingredient | Amount | Notes |
|---|---|---|
| Chicken Thighs (bone-in, skin-on) 🍗 | 2 ½ lb | Juicy and flavorful, skin left on |
| Yellow Onion 🧅 | 1 whole | Diced into small pieces |
| Carrots 🥕 | 1 ½ lb | Peeled, cut into chunks |
| Fresh Peas 🌱 | 1 ½ cups | Frozen works in a pinch |
| Garlic Cloves 🧄 | 4 cloves | Minced for deep flavor |
| Fresh Thyme 🌿 | 1 tbsp | Leaves only, chopped fine |
| Bay Leaves 🍃 | 2 whole | Remove before serving |
| Chicken Broth 💧 | 2 cups | Low-sodium preferred |
| Cornstarch 🌾 | 1 tbsp | For that perfect thickened texture |
| Unsalted Butter 🧈 | 1 cup | Cold, cubed for flaky crust |
| All-Purpose Flour 🌾 | 2 ½ cups | Plus 1 tbsp for dusting |
| Ice Water 💧 | ½ cup | For pie dough elasticity |
| Salt 🧂 | 1 ½ tsp | Kosher or sea salt |
| Black Pepper 🌶️ | ½ tsp | Freshly ground preferred |
| Heavy Cream 🥛 | ½ cup | For extra richness |
The chicken thighs are non-negotiable here—they stay juicy while the breasts dry out. Look for bone-in, skin-on pieces at Whole Foods or your local butcher shop. If you're using frozen, thaw them overnight in the fridge. For the veggies, fresh peas taste best, but frozen work in a pinch—just don't thaw them first. The carrots should be bright orange, not dull. Thyme and bay leaves? Penzeys has the best dried thyme if you want to splurge, but the grocery store stuff works fine too. Just don't skip them—they're the secret to that restaurant-quality depth.
No chicken broth? Vegetable broth with a splash of soy sauce gets you close. Running low on cornstarch? All-purpose flour at half the amount works in a bind. The butter for the crust needs to be cold and cubed—microwave it 40 seconds if it's too soft. For the filling, I always add a splash of heavy cream at the end—it makes the whole thing taste richer. Want to make it ahead? Assemble the pie, refrigerate overnight, then bake straight from the fridge for extra crispy edges. The lattice crust option? Just cut the dough strips and weave them over the filling.
This pie reheats beautifully—honestly tastes better the next day once everything melds. Keeps 4-5 days in the fridge, freezes for 3 months. I portion mine into containers so lunches are sorted for the week. The crust? Store it separately in the fridge for up to 3 days if you want to bake it fresh. For make-ahead magic, prep the filling and crust separately, then assemble right before baking. Trust me on the cold butter—it's what makes that flaky crust happen.
Why You'll Love This Recipe
- Skin-On Magic: I swear by bone-in, skin-on thighs—they render into crispy, golden perfection while staying juicy inside. That crispy skin? It’s the secret weapon no shortcut can replace.
- One-Pot Wonder: Dice the onion and carrots while the chicken browns—no fancy prep, just hands-off cooking. By the time the peas are tender, the whole thing smells like a hug from your grandma.
- Leftovers That Shine: This dish tastes even better the next day, especially with a quick reheat. Pack it for lunch or freeze portions—it’s my go-to for lazy mornings when I need something hearty without effort.
- Budget-Friendly Feast: Chicken thighs stretch further than breasts, and frozen peas keep costs low. A single batch feeds four for dinner and leaves enough for leftovers—no wasted ingredients here.
Step-by-step instructions for authentic chicken pot pie
Here's how to build the perfect pot pie with layers of flavor and a golden, flaky crust.
🍳 Step 1: Sear the Chicken and Sauté the Vegetables
Pat the 2.5 lb chicken thighs dry with paper towels and season generously with 1.5 tsp salt and 0.5 tsp black pepper. Heat a large Dutch oven over medium-high heat and add 1 cup unsalted butter, letting it melt completely. Add the chicken thighs skin-side down and cook for 6-8 minutes until the skin is golden brown and crispy.
Flip the chicken and cook for another 5-6 minutes until the skin is golden on the other side. Remove the chicken from the pot and set aside. In the same pot, add the diced 1 whole yellow onion and cook for 3-4 minutes until softened. Add the peeled and chunked 1.5 lb carrots and cook for another 5 minutes until they begin to soften.
👨🍳 Step 2: Build the Savory Filling
Add the 4 minced garlic cloves, 1 tbsp fresh thyme, and 2 whole bay leaves to the pot. Stir everything together for 1 minute to let the aromatics bloom. Pour in the 2 cups chicken broth and bring the mixture to a gentle simmer. Return the chicken thighs to the pot and let everything cook together for 10 minutes. Remove the chicken thighs and shred the meat, discarding the skin and bones.
Return the shredded chicken to the pot and stir in the 1.5 cups fresh peas and 0.5 cup heavy cream. Mix well to combine. In a small bowl, whisk together 1 tbsp cornstarch with 2 tablespoons of the chicken broth to make a slurry. Slowly pour the slurry into the pot while stirring constantly. Let the filling simmer for 5-7 minutes until it thickens to a creamy consistency. Taste and adjust seasoning if needed.
🥘 Step 3: Prepare the Flaky Pie Dough
In a large bowl, combine the 2.5 cups all-purpose flour and 1.5 tsp salt. Cut in the 1 cup cold unsalted butter using a pastry cutter or your fingers until the mixture resembles coarse crumbs. Gradually add the 0.5 cup ice water, one tablespoon at a time, mixing just until the dough comes together. Avoid overmixing—this ensures a tender crust.
Turn the dough out onto a lightly floured surface and knead it gently for 1-2 minutes until smooth. Divide the dough into two equal parts and roll each into a circle about 12 inches in diameter. Place one dough circle over the filling in the Dutch oven, pressing it gently to create a seal. Trim any excess dough around the edges.
🔥 Step 4: Bake to Golden Perfection
Preheat your oven to 375°F. Brush the top crust with a bit of ice water to help it brown evenly. Cut a few small slits in the top crust to allow steam to escape. Place the pot pie on a baking sheet to catch any drips and bake for 45-50 minutes until the crust is deep golden brown and the filling is bubbling.
Remove the pot pie from the oven and let it rest for 10 minutes before serving. This resting time allows the filling to set slightly and makes it easier to slice. Serve warm, removing the 2 whole bay leaves before serving. Each bite should deliver tender chicken, sweet carrots, and fresh peas all wrapped in a buttery, flaky crust.
Pro Tips For Making Authentic Chicken Pot Pie
- Brown the Skin First: That crispy skin is the real star here—don’t skip the 8-10 minutes per side in a screaming-hot pan. I learned this the hard way when I rushed it and ended up with soggy, flavorless thighs. Use a heavy skillet (cast iron if you’ve got it) and don’t move them until the skin’s deeply golden.
- Cut Onions Small: Tiny dice, not chunks—think 1/4-inch pieces or smaller. Big onions just sit there while everything else cooks. My grandmother swore by this, and she was right: they melt into the sauce instead of turning to mush.
- Wait for the Peas: Add fresh peas in the last 5 minutes of cooking—any earlier, and they’ll turn to mush. If using frozen, toss them in the last 3 minutes and stir like you’re trying to win an award for it. (Yes, even if you’re impatient like me.)
- Deglaze with Wine: After browning the chicken, don’t just splash in water—use 1/2 cup dry white wine (or broth) and scrape every last bit from the pan. That browned-on flavor is where the magic happens, and skipping it means a duller sauce. (Your future self will thank you.)
Pro cooking tips for this dish
Dutch Oven Mastery
Your Dutch oven is the secret weapon here—it needs to be heavy and well-seasoned for even heat distribution. I swear by Le Creuset or Lodge cast iron for that perfect balance of heat retention and crispy crust.
Preheat it alongside your oven to ensure the filling stays hot while the crust bakes. 🌡️
Never skip the drip pan underneath! Place your Dutch oven on a baking sheet to catch any spills from the filling or butter—trust me, this prevents a messy oven. The Dutch oven’s tight lid also helps steam the filling while baking, creating that signature dumpling-like texture.
Filling Thickening
The cornstarch slurry is non-negotiable for that perfect creamy yet thick filling. Whisk it vigorously with cold broth to prevent lumps—heat activates the cornstarch, but cold liquid ensures smooth incorporation. Simmer for exactly 5-7 minutes after adding it; any longer and the filling risks becoming gluey.
For extra richness, I always add a splash of heavy cream at the end—just ¼ cup—to round out the flavors. If your filling looks too thin after simmering, mix another ½ tsp cornstarch with 1 tbsp cold water and stir in.
This is my fail-safe for when the first slurry doesn’t quite cut it.
Crust Perfection
Cold butter is your flaky crust’s best friend—never let it soften! Cut it into ½-inch cubes and work it into the flour with your fingers or a pastry cutter until it resembles coarse crumbs.
Overmixing turns the dough tough, so handle it gently. Chill the dough for 15 minutes before rolling to prevent shrinking.
For a lattice crust, roll out the second dough sheet and cut it into ½-inch strips with a pizza cutter. Arrange them in a crisscross pattern over the filling, leaving gaps for steam to escape.
Brush the lattice with egg wash (1 egg + 1 tbsp water) for extra shine and crispiness.
Blind-Baking Hack
Prevent a soggy bottom by blind-baking the top crust first. Line the crust with parchment paper, fill it with pie weights or dried beans, and bake at 375°F for 10 minutes before adding the filling.
This ensures the crust stays crisp even when exposed to the hot filling. Remove the weights and parchment before adding the filling.
If you’re short on time, skip the blind-baking and brush the bottom crust with beaten egg before adding the filling. The egg acts as a barrier, creating a subtle separation that keeps the crust from absorbing too much moisture. Just don’t overdo it—too much egg makes the crust gummy.
Resting Matters
Let the pie rest for at least 10 minutes before slicing—this is where the magic happens! The filling thickens slightly as it cools, and the crust firms up, making it easier to slice cleanly.
I often rest mine for 15-20 minutes if I’m serving a crowd, especially if the filling is extra creamy.
Pro tip: Use a serrated knife and dip it in hot water between slices to prevent sticking. Serve the pie straight from the Dutch oven for that restaurant-style** presentation, or transfer it to a platter for a more elegant look. The aroma alone will have everyone at the table!
Nutrition facts
Frequently asked questions
Why do you use chicken thighs instead of breasts for this recipe?
Chicken thighs stay juicy and flavorful while cooking, whereas breasts often dry out in the rich, creamy filling. The skin-on thighs add extra richness when seared, creating a deeper, more satisfying taste. For best results, use bone-in thighs—they stay moist and add natural flavor to the broth.
Can I make this pot pie ahead of time?
Assemble the pie and refrigerate it overnight, then bake straight from the fridge for extra crispy edges. The filling will taste even more flavorful after resting. For longer storage, freeze the assembled pie (unbaked) for up to 3 months. Thaw in the fridge before baking.
What if my crust turns out soggy?
Soggy crusts usually happen when steam gets trapped. Prevent this by cutting small slits in the top crust before baking to release steam, or try blind-baking the top crust first. For extra insurance, brush the bottom crust with beaten egg before adding filling—it creates a moisture barrier.
Can I substitute frozen peas for fresh?
Yes, frozen peas work perfectly! Just don't thaw them first—add them straight from the freezer to the simmering filling. They'll cook through while the rest of the filling thickens. For best texture, use peas that are fully frozen but not icy.
How do I make this gluten-free?
Replace the all-purpose flour with a 1:1 gluten-free flour blend (like Bob's Red Mill) and use gluten-free oats in the crust. For the filling, ensure your cornstarch and chicken broth are certified gluten-free. The texture will be slightly different but still delicious!