
Main Courses
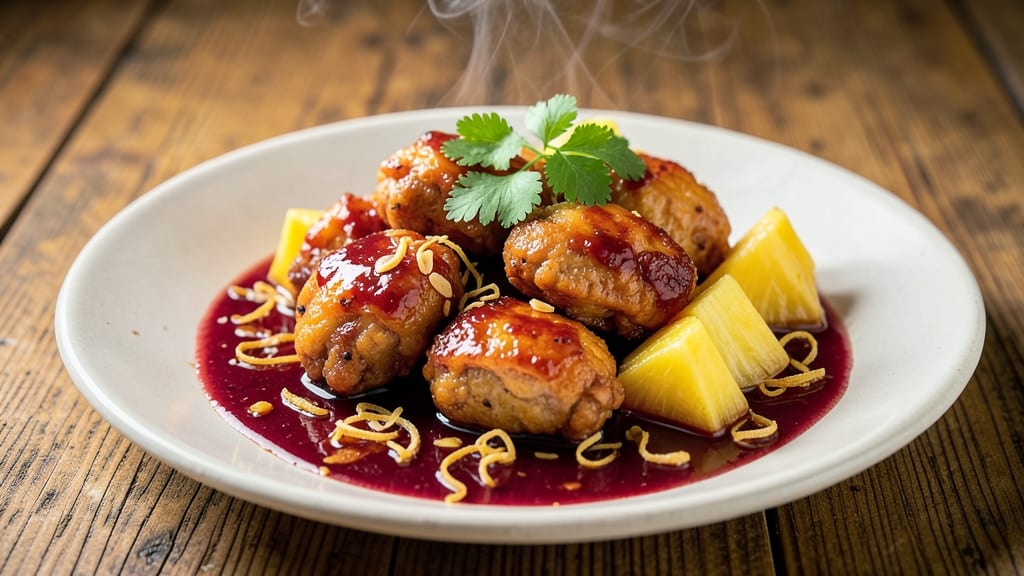
This basic sweet and sour chicken recipe delivers the perfect balance of crispy, golden chicken and a tangy pineapple glaze that's impossible to resist. 🌟 The secret lies in pan-frying the chicken to achieve that satisfying crunch, then simmering it in a sweet-and-sour sauce that's both vibrant and deeply flavorful.
I've refined this recipe over countless weeknight dinners, ensuring it's foolproof yet packed with restaurant-quality taste.
The process starts with tenderizing chicken pieces in a simple marinade, then searing them until crispy before tossing them in a sauce made with pineapple juice, vinegar, and a touch of sugar. This combination creates a glaze that's sweet, tangy, and just slightly sticky—ideal for coating every bite of chicken.
The beauty of this recipe is its versatility; it works equally well with pan-frying, air-frying, or even baking for those who prefer a hands-off approach.
By the time you're done, you'll have a dish that's crispy on the outside, tender on the inside, and coated in a glossy, tangy-sweet sauce that's perfect for serving over steamed rice or with a side of steamed vegetables.
The aroma alone will have everyone gathering around the table, and the first bite delivers that perfect harmony of textures and flavors. This is comfort food at its finest, with just the right balance of sweet and sour.
Whether you're feeding a family or hosting a dinner party, this recipe scales beautifully while maintaining its simplicity. The sauce can be made ahead, and the chicken cooks quickly, making it a great option for busy weeknights.
Let's get started on creating this crowd-pleasing dish that's sure to become a staple in your recipe rotation.
Ingredients for basic sweet and sour chicken
Crispy chicken bites and a tangy pineapple glaze—this recipe delivers restaurant-quality flavor with pantry staples you already own.
| Ingredient | Amount | Notes |
|---|---|---|
| Boneless, Skinless Chicken Thighs 🍗 | 1 ½ lb | Cut into 1-inch pieces for even cooking |
| Cornstarch 🌾 | ½ cup | For crispy coating |
| All-Purpose Flour 🌾 | ½ cup | For coating chicken |
| Vegetable Oil 🫒 | ½ cup | For pan-frying |
| Pineapple Juice 🍍 | 1 cup | Fresh or canned (no sugar added) |
| Rice Vinegar 💧 | ½ cup | White vinegar works too |
| Granulated Sugar 🍚 | ½ cup | Light brown sugar for depth |
| Soy Sauce 🥢 | ¼ cup | Low-sodium preferred |
| Garlic Cloves 🧄 | 4 cloves | Minced for sauce |
| Fresh Ginger 🌿 | 1 tbsp | Grated finely |
| Red Bell Pepper 🌶️ | 1 whole | Diced for sauce |
| Green Onion 🧅 | 2 whole | Sliced for garnish |
| Salt 🧂 | 1 tsp | Kosher or sea salt |
| Black Pepper 🌶️ | ½ tsp | Freshly ground |
The chicken thighs are the star here—thighs stay juicier than breasts during frying. Grab a 1.5 lb package from the grocery store's meat section, or ask the butcher to cut them into 1-inch pieces for you. For the cornstarch, Bob's Red Mill brand works best—it's fine enough to create that perfect crispy crust. If you're short on time, Trader Joe's sells pre-cut frozen chicken pieces that work great too. Just pat them dry before coating—wet chicken equals soggy coating!
No pineapple juice? Coconut water or apple juice works in a pinch, though the flavor won't be identical. The rice vinegar gives that signature tang—substitute with white vinegar or lemon juice, but reduce to 3 tbsp since they're stronger. For the sugar, light brown sugar adds depth, but white sugar is fine if that's what you've got. The soy sauce should be low-sodium—regular brands can make the sauce too salty. Fresh ginger? Grate it yourself—it's worth the minute, but jarred works if you're in a hurry.
This sauce keeps for 4-5 days in the fridge, so make extra for stir-fries or rice bowls. The chicken reheats beautifully—microwave 30 seconds or warm in a skillet. For meal prep, store components separately: sauce in a jar, chicken in a container. Reheat the sauce first, then toss the chicken in it. Freeze the sauce alone for up to 3 months—it's perfect for quick weeknight dinners!
Why You'll Love This Recipe
- No-Fuss Coating: I toss the chicken thighs in cornstarch and flour—no fancy marinating, no special prep. That light, crispy crust happens just from shaking them in a bag, and honestly? It’s the secret to restaurant-style texture without the fuss.
- Tangy Crunch Magic: The pineapple juice cuts through the richness of the chicken, while the cornstarch coating turns golden in oil—crispy, not greasy. That first bite? Sweet, sour, and addictive, with a bite that lingers just right.
- Leftover Hero: This dish actually improves the next day. The sauce thickens slightly, clinging better to the chicken, and it reheats like a dream. Pack it for lunch or freeze portions—no one will guess it’s "basic."
- Budget Crowd-Pleaser: Chicken thighs stretch further than breasts, and pineapple juice replaces pricier sauces. Serve it over rice for a full meal, or let everyone grab a piece straight from the pan. My wallet and my family thank me every time.
Step-by-step instructions for sweet and sour chicken
Here's how to make restaurant-style sweet and sour chicken with perfect crispy bites and tangy glaze!
👨🍳 Step 1: Prep the Chicken for Maximum Crispiness
Cut the 1.5 lb boneless, skinless chicken thighs into 1-inch pieces for even cooking. In a large bowl, combine the 0.5 cup cornstarch and 0.5 cup all-purpose flour - this is your secret to that perfect crispy coating. I like to use a whisk to break up any lumps in the cornstarch for an ultra-smooth batter.
Add the chicken pieces to the flour mixture and toss gently until each piece is fully coated. Don't worry if it looks messy - that's how you get that golden, shatteringly crisp crust. Let the coated chicken sit for 5 minutes while you heat the oil. This resting time helps the coating adhere better and prevents the chicken from absorbing too much oil during frying.
🔥 Step 2: Pan-Fry to Golden Perfection
Heat 0.5 cup vegetable oil in a large skillet over medium-high heat until it shimmers and reaches 350°F - about 3-4 minutes. The oil should be hot enough that when you drop in a piece of chicken, it sizzles immediately and bubbles vigorously. Add the chicken in a single layer (work in batches if needed) and cook undisturbed for 3-4 minutes until golden brown on the bottom.
Here's the thing - don't flip too soon! You'll know it's ready when the edges are golden and the chicken releases easily from the pan. Flip carefully and cook another 3-4 minutes until golden on all sides. Transfer to a paper towel-lined plate to drain excess oil. The chicken should be crispy outside while staying juicy inside - that's the magic we're after!
🍳 Step 3: Build the Tangy Sauce
In the same skillet (no need to clean it - those crispy bits add flavor!), add 1 tbsp fresh ginger and 4 cloves garlic cloves, mincing them right in the pan. Cook for 30 seconds until fragrant - you'll smell that wonderful aromatic punch. Add 1 whole red bell pepper, diced, and cook for 2 minutes until slightly softened.
Pour in 1 cup pineapple juice, 0.5 cup rice vinegar, 0.5 cup granulated sugar, and 0.25 cup soy sauce. Bring to a boil, then reduce heat to medium-low and simmer for 5-6 minutes until the sauce thickens slightly. The mixture should coat the back of a spoon and have a beautiful glossy sheen. Taste and adjust - you might want to add a pinch more sugar or vinegar depending on your preference.
🥘 Step 4: Combine and Finish
Return the crispy chicken to the skillet with the sauce. Toss gently to coat the chicken evenly - you want every bite to have that perfect balance of crispy chicken and tangy glaze. Let it simmer together for 2-3 minutes until the chicken absorbs some of the sauce flavor. The chicken should be completely coated in that glossy, sweet-sour mixture.
Garnish with 2 whole green onions, sliced, for freshness and pop of color. Serve immediately over steamed rice or noodles - the contrast of the warm rice with the crispy chicken and tangy sauce is what makes this dish so irresistible. The secret to the best presentation is to drizzle any extra sauce from the pan over the top!
Pro Tips For Making Basic Sweet And Sour Chicken
- Double-Dip the Chicken: Toss your chicken thighs in flour first, then dip in beaten egg, then back in flour—this creates a thicker, stickier crust that won’t fall apart when frying. I learned this the hard way after my first batch turned into sad, crumbly nuggets.
- Use Cold Pineapple Juice: Chill your pineapple juice in the fridge before adding it to the sauce—it prevents the sauce from curdling when it hits the hot pan. I was skeptical until I tried it, and now I never skip this step.
- Fry in Batches: Overcrowding the pan drops the temperature and makes your chicken steam instead of crisp up. Fry in small batches, and keep the oil hot—this guarantees golden, crunchy chicken every time.
- Deglaze with Vinegar: After removing the chicken, splash in 1 tablespoon of rice vinegar (or white vinegar) to cut through any leftover oil and brighten the sauce. It’s a quick upgrade that makes the dish taste restaurant-worthy.
Perfect pairings for these flavors
Rice Pairings
Steamed jasmine rice is my go-to pairing—its delicate floral aroma complements the dish's tangy-sweet sauce beautifully. Cook 1 cup jasmine rice with 1.5 cups water for 15 minutes in a rice cooker, then fluff with a fork.
For extra flair, stir in 1 tsp sesame oil and 1 tbsp toasted sesame seeds before serving. 🌾
For a heartier option, try brown rice—it adds nutty depth that balances the sauce's brightness. Rinse 1 cup brown rice thoroughly, then cook with 2 cups water for 45 minutes. The extra cooking time is worth it for that satisfying texture contrast.
Vegetable Sides
Steamed bok choy adds freshness and a slight bitterness that cuts through the sauce's sweetness. Blanch 4 stalks in boiling water for 2 minutes, then shock in ice water. Toss with 1 tsp toasted sesame oil and a pinch of salt. 🥬
For a crunchy element, serve quick-pickled cucumbers. Thinly slice 1 English cucumber, then soak in ½ cup rice vinegar, 1 tbsp sugar, and ½ tsp salt for 30 minutes. The acidity brightens every bite of chicken.
Drink Pairings
A crisp green tea like japanese sencha cleanses the palate between bites. Its subtle grassy notes enhance the dish's citrusy sauce without overpowering it. For a caffeine-free option, try hibiscus iced tea—its tartness mirrors the sauce's tang. 🍵
For beer lovers, a light lager like Asahi Super Dry works perfectly. The crisp, clean finish balances the dish's sweet and sour profile. Avoid heavy stouts or malty ales—they’ll clash with the sauce's brightness.
Garnish Finishes
Fresh cilantro adds a bright, herbaceous note that elevates the dish. Chop ¼ cup and sprinkle over the chicken just before serving. The lime-like flavor pairs surprisingly well with the pineapple sauce. 🌿
For a smoky touch, drizzle 1 tsp chili oil over the top. Heat 2 tbsp neutral oil with 1 tsp crushed red pepper flakes until fragrant, then strain. The heat contrasts beautifully with the sweet-sour balance.
Nutrition facts
Frequently asked questions
Can I use chicken breasts instead of thighs?
Yes, but thighs are ideal for this recipe! Chicken breasts cook faster and can dry out if overcooked. If using breasts, cut them into ½-inch thick pieces and cook for just 2-3 minutes per side over medium heat to keep them juicy.
How do I make the sauce less sweet?
Reduce the sugar to ¼ cup and increase the vinegar to ⅔ cup. For extra tang, add 1 tbsp lemon juice or a pinch of salt. Taste as you go—balance is key! The sauce should be vibrant, not cloying.
Can I bake this instead of pan-frying?
Toss the coated chicken with 1 tbsp oil and bake at 400°F for 18-20 minutes, flipping halfway. For crispiness, broil for 2 minutes at the end. The sauce can be simmered separately and tossed with the chicken after baking.
What if my sauce is too thin?
Simmer uncovered for 5-10 extra minutes to reduce it. For quicker results, mix 1 tsp cornstarch with 1 tbsp water and stir into the sauce. Cook for 1-2 minutes until it thickens. The sauce should coat the back of a spoon.
Is this dish gluten-free?
Not as written, but you can adapt it! Use a gluten-free flour blend (like rice flour) instead of all-purpose flour, and ensure your soy sauce is tamari. The cornstarch can be swapped for arrowroot powder. Double-check all ingredients for hidden gluten.