
Main Courses
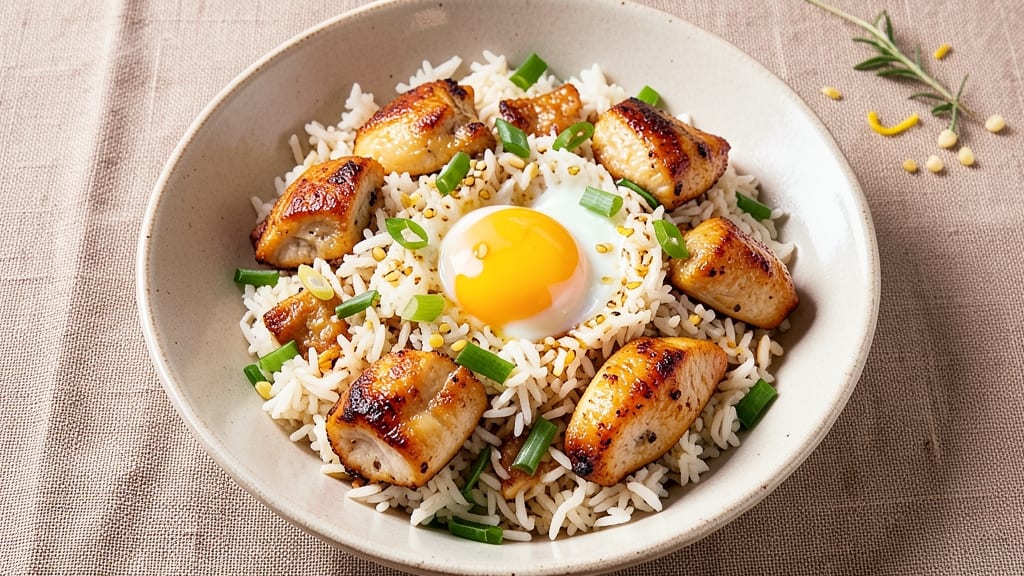
This baked chicken fried rice recipe transforms a weeknight dinner into a crispy-topped masterpiece with minimal effort. The secret lies in baking the chicken first—achieving that perfect golden crust while keeping the meat juicy—before combining it with perfectly seasoned rice in a single pan.
I’ve perfected this technique over years of testing, ensuring every bite delivers the harmony of tender chicken, aromatic rice, and a satisfying crunch from the crispy top layer.
The beauty of this dish is its simplicity: no stir-frying required. You’ll start by seasoning and baking the chicken until it’s golden and fully cooked, then mix it with pre-cooked rice and a flavorful sauce.
The magic happens when it all goes back in the oven, where the top becomes irresistibly crispy while the rice stays tender. This method saves time and cleanup, making it ideal for busy weeknights or meal prep.
What you’ll end up with is a restaurant-quality dish that’s packed with flavor and texture—juicy chicken, savory rice, and that coveted crispy crust that makes every bite exciting. The combination of baked chicken and fried rice creates a balance of protein and carbs that’s both satisfying and balanced.
This recipe is designed to impress without the fuss, proving that one-pan meals can be just as flavorful as they are convenient.
Serve it as a complete meal or pair it with a simple side salad or steamed vegetables for a well-rounded dinner. The crispy-topped finish ensures it’s a crowd-pleaser, whether you’re cooking for family or hosting dinner guests. Ready to elevate your weeknight dinners? Let’s get started.
Ingredients for baked chicken fried rice
Pantry staples plus a few fresh ingredients for that crispy, golden finish you crave.
| Ingredient | Amount | Notes |
|---|---|---|
| Boneless, Skinless Chicken Breast 🍗 | 1 ½ lb | Cut into 1-inch pieces |
| Cooked White Rice 🍚 | 3 cups | Day-old rice preferred |
| Eggs 🥚 | 2 whole | Lightly beaten |
| Soy Sauce 🍶 | ⅓ cup | Low-sodium preferred |
| Sesame Oil 🫒 | 1 tbsp | For aroma, not heat |
| Green Onions 🧅 | ¼ cup | Sliced, white and green parts |
| Garlic Cloves 🧄 | 4 cloves | Minced |
| Salt 🧂 | 1 tsp | Kosher or sea salt |
| Black Pepper 🌶️ | ½ tsp | Freshly ground |
| Vegetable Oil 🫒 | 1 tbsp | For greasing pan |
| Cornstarch 🌾 | 1 tbsp | For crispy topping |
| Butter 🧈 | 2 tbsp | Unsalted, cubed |
| Frozen Peas 🌱 | ½ cup | Thawed |
The chicken is the star here—cut it into even 1-inch pieces so it cooks through perfectly. I grab boneless, skinless breasts from the store (they're usually pre-cut), but if you want extra flavor, pat them dry first. The rice? Day-old rice is non-negotiable—it's drier and absorbs flavors better. I always cook a big batch on Sunday so I've got it ready for weeknight meals. For the green onions, grab a bunch from the grocery store—they're cheap and last longer than the pre-chopped stuff in containers.
No soy sauce? Coconut aminos or tamari work great, though the flavor will be slightly different. Short on sesame oil? Skip it entirely—it's mostly for aroma, not heat. The cornstarch is key for that crispy top—don't substitute with flour. If you're prepping ahead, cook the chicken and rice separately and assemble just before baking. The peas can be swapped for carrots or bell peppers if you prefer something sweeter. And trust me on the butter cubes—they melt into the rice, adding richness without making it soggy.
This reheats beautifully—just cover with foil and pop in the oven for 10 minutes at 375°F. Keeps for 3 days in the fridge, though I never make it that long. For meal prep, divide into individual portions before baking so you can just reheat what you need. The crispy top gets softer when reheated, but it's still delicious. Freezes well too—up to 2 months—just thaw overnight in the fridge before reheating.
Why You'll Love This Recipe
- One-Pan Magic: I swear by this recipe when I’m too tired to scrub pots—just toss everything on a sheet pan, bake, and walk away. The chicken stays juicy while the rice soaks up that savory soy-sesame punch without sticking.
- Umami Bomb: That crispy chicken paired with the soft egg ribbons? It’s like a flavor explosion in your mouth. The sesame oil gives it this toasty depth, and the soy sauce ties it all together—simple but ridiculously satisfying.
- Lunchbox Hero: Between us, this is my go-to for meal prep. Cold or reheated, it’s always a hit—pack it for work, toss it in a bento, or feed a crowd. Honestly, I’ve served it at potlucks, and no one’s ever questioned why it’s missing their usual takeout.
- Budget Win: I use chicken breast because it’s affordable, and leftover rice? Always in my freezer. A few eggs, a splash of soy sauce, and a drizzle of sesame oil—this feeds four for under $10. (Yes, even on a Tuesday night.)
Step-by-step instructions for baked chicken fried rice
This one-pan method delivers crispy tops and savory layers without the stovetop mess.
Prep the Chicken and Mix the Base
Cut the 1.5 lb boneless, skinless chicken breast into 1-inch pieces—smaller pieces cook faster and stay juicy. In a large bowl, combine the 3 cups cooked white rice, 0.33 cup soy sauce, 1 tbsp sesame oil, 0.25 cup sliced green onions, 4 minced garlic cloves, 1 tsp salt, and 0.5 tsp black pepper. Stir until the rice is evenly coated and the aromatics are distributed. The rice should look glistening but not soggy—this ensures a flavorful, cohesive dish.
Here's the thing—day-old rice works best because it's drier and less sticky. If you're using freshly cooked rice, spread it on a tray and let it cool completely before mixing. This step prevents a gummy texture in the final dish.
Layer Everything in a Baking Dish
Lightly grease a 9x13-inch baking dish with 1 tbsp vegetable oil—this prevents sticking and helps create that crispy top later. Spread the rice mixture evenly in the dish, pressing down gently with a spatula. Create a well in the center and add the chicken pieces, arranging them in an even layer. Scatter the 0.5 cup thawed frozen peas over the chicken.
Don't pack the rice too tightly—you want room for the crispy topping to form. If the dish looks uneven, use the back of a spoon to smooth it out. This layering ensures the chicken cooks through while the top gets that golden, crunchy finish.
Make the Crispy Topping and Assemble
In a small bowl, whisk together the 2 lightly beaten eggs and 1 tbsp cornstarch until smooth. This mixture is your secret weapon for that crispy, almost fried-rice-top texture. Sprinkle 2 tbsp cubed unsalted butter evenly over the chicken and rice, then pour the egg mixture over the top. Use a fork to gently drag the egg mixture through the butter, creating streaks but avoiding overmixing.
Real talk: The butter and egg combo creates a golden, almost pancake-like crust on top. If you're worried about it being too rich, don't be—the heat will render the butter perfectly, leaving just the right amount of richness without overpowering the dish.
Bake Until Golden and Crispy
Preheat your oven to 375°F—this temperature gives you a balance of crispy top and fully cooked chicken. Bake the dish for 25-30 minutes until the top is deep golden brown and the chicken reaches an internal temperature of 165°F. You'll see the edges pull away slightly from the pan, and the top should look like a crispy, almost fried-rice crust.
Don't walk away during the last 5 minutes—keep an eye on it. If the top starts to brown too quickly, tent it loosely with foil to prevent burning. The moment it's golden and the chicken is cooked through, it's time to serve. The crispy top will soften slightly as it cools, but it's still worth the wait.
Rest and Serve with Confidence
Let the dish rest for 5 minutes before serving. This allows the juices to redistribute, ensuring each bite is moist and flavorful. The crispy top will hold together better after resting, making it easier to serve. Use a spatula to carefully lift the crispy layer and place it on top of each serving—this is where the magic happens.
Garnish with extra green onions if you like, but honestly, the dish is already packed with flavor. Each bite should deliver tender chicken, savory rice, and that irresistible crispy top. Serve with a side of steamed veggies or a simple cucumber salad to balance the richness.
Pro Tips For Making Baked Chicken Fried Rice
- USE COLD RICE: Day-old rice is your best friend here—it’s drier, less sticky, and toasts up perfectly. If you’re using freshly cooked rice, spread it on a tray and refrigerate for 30 minutes first (yes, even if you’re impatient like me).
- SALT THE CHICKEN FIRST: Season the chicken breast with soy sauce, a pinch of salt, and a drizzle of sesame oil before baking. This keeps it juicy and adds flavor deep inside, not just on the surface. Skip this, and you’ll end up with bland, dry chicken.
- SCRAMBLE EGGS FAST: Whisk eggs with a splash of soy sauce and sesame oil, then scramble them in a nonstick pan over medium-high heat for 30 seconds—just until almost set. Fold them into the rice at the end so they stay soft and creamy, not rubbery.
- BAKE CHICKEN UNTIL 165°F: Chicken breast hits 165°F fast—pull it out early, or it’ll dry out before the rice is done. Use a meat thermometer, and if you don’t have one, cut into the thickest piece: it should be opaque with no pink. Overcooking is the #1 way to ruin this dish.
Best sauces and condiments for this baked chicken fried rice
Classic Soy-Garlic Sauce
This is the foundation of your dish—⅓ cup low-sodium soy sauce and 4 minced garlic cloves create the perfect umami base. I like to add 1 tsp sugar to balance the saltiness, especially if using regular soy sauce.
For extra depth, stir in ½ tsp grated ginger and let it sit with the rice for 10 minutes before baking. The longer the marinade, the more flavorful the rice becomes. 🍶
Sesame Oil Finish
Don’t skip the 1 tbsp sesame oil—it’s not just for flavor, but for that authentic aroma. Add it to the rice mixture after combining all ingredients, then stir gently to distribute evenly. If you’re sensitive to sesame, reduce to ½ tsp or omit entirely.
For a smoky twist, swap in ½ tsp chili crisp with the sesame oil. The oil should sizzle slightly when the dish comes out of the oven, releasing its nutty fragrance. 🌶️
Butter-Cornstarch Crispy Top
The secret to that irresistible golden crust lies in the 2 tbsp cubed butter and 1 tbsp cornstarch mixed with the eggs. The cornstarch creates a light, crispy texture, while the butter adds richness.
For a lighter version, use olive oil instead of butter, but you’ll lose some of that buttery depth. Spread the egg mixture evenly over the top—this is where the magic happens as it bakes. 🧈
Spicy Sriracha Swirl
For a kick, drizzle 1 tbsp Sriracha over the crispy top just before serving. The heat cuts through the richness beautifully. I also like to add ½ tsp smoked paprika to the egg mixture for a smoky flavor.
If you prefer sweet heat, swap the Sriracha for 1 tbsp honey mixed with ½ tsp cayenne pepper. The contrast of sweet, spicy, and savory makes every bite exciting. 🔥
Green Onion Garnish
Fresh green onions add a bright pop of color and freshness. Slice ¼ cup into thin rounds and sprinkle over the top just before serving.
For extra flair, use a microplane to zest a little lime peel over the dish—it adds a citrusy brightness that pairs perfectly with the savory rice. The green onions also make the dish look restaurant-worthy with minimal effort. 🧅
Optional Miso Glaze
For umami lovers, brush the crispy top with 1 tbsp white miso paste mixed with 1 tsp water before baking. The miso caramelizes beautifully, adding a deep, savory note. If you don’t have miso, a splash of fish sauce works in a pinch.
The glaze should be thin enough to spread evenly—thick glaze will burn before the dish is fully cooked. 💫
Nutrition facts
Frequently asked questions
Why does the recipe call for day-old rice?
Day-old rice is crucial because it's drier and less sticky, which prevents your baked dish from becoming gummy. Freshly cooked rice releases too much moisture when baked, leading to a mushy texture. If you only have fresh rice, spread it on a tray and let it cool completely before using. This simple step makes all the difference in achieving that perfect crispy top!
Can I use chicken thighs instead of breasts?
Chicken thighs actually work beautifully here—they stay juicier during baking and have more flavor. Use 1.5 lbs of boneless, skinless thighs cut into 1-inch pieces, and reduce the baking time by 5 minutes since thighs cook faster than breasts. The crispy skin adds extra texture if you leave it on. Just watch the internal temperature—it should reach 165°F for safety.
What if my crispy top isn't forming properly?
This usually happens when the egg mixture isn't spread evenly or the oven isn't hot enough. First, make sure your oven is fully preheated to 375°F. Spread the egg-butter mixture in thin, even strokes across the top. For extra crispiness, broil for 1-2 minutes at the very end (watch closely!). If it still doesn't crisp, try adding ½ tsp more cornstarch to the egg mixture next time. Patience is key—don't open the oven door during baking.
How can I make this dish spicier?
Add heat by mixing ½-1 tsp chili flakes or 1 tbsp gochujang into the rice mixture before baking. For a smoky kick, stir ½ tsp smoked paprika into the egg topping. After baking, drizzle with 1-2 tbsp Sriracha or a swirl of sriracha-honey mix. For extra depth, add ½ tsp cayenne pepper to the soy sauce marinade. Start with less and adjust to taste—you can always add more heat!
Can I make this ahead of time?
Yes! Assemble the dish (including the egg topping) up to 24 hours ahead and refrigerate uncovered. When ready to bake, add 5-10 minutes to the baking time since it starts cold. For meal prep, divide into portions before baking—just reheat covered with foil at 350°F for 15 minutes. The crispy top will soften slightly but still be delicious. Freeze for up to 2 months—thaw overnight before reheating.