
Main Courses
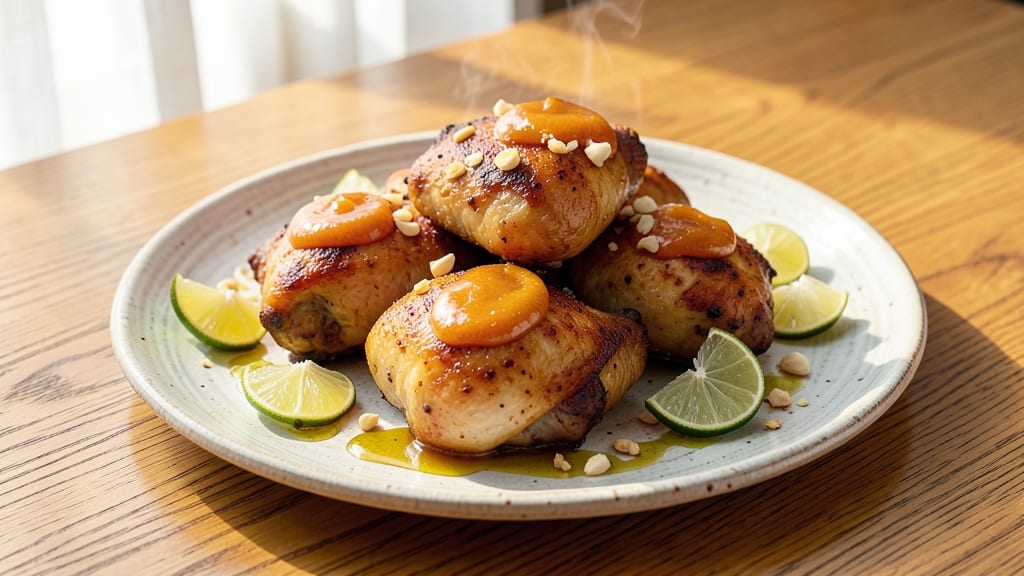
This baked chicken Pinoy recipe delivers the perfect balance of crispy parmesan crust and juicy centers—a Filipino comfort food classic that’s easier than takeout. 🌟 After years of perfecting the technique, I’ve cracked the code for achieving that golden, crunchy exterior while keeping the meat tender and flavorful inside.
The secret lies in a simple marinade that infuses the chicken with savory, slightly sweet notes before baking.
The recipe starts with a flavorful marinade of soy sauce, calamansi (or lemon juice), garlic, and a touch of banana ketchup for that signature Filipino tang. This marinade not only enhances the flavor but also helps tenderize the chicken, ensuring it stays moist even after baking.
The parmesan crust adds a crispy, cheesy finish that’s impossible to resist—no frying required. It’s the kind of dish that transforms a simple weeknight dinner into a celebration.
By the time it comes out of the oven, you’ll have golden-brown chicken with a crispy parmesan crust that shatters at every bite, revealing juicy, flavorful meat underneath. The aroma alone will have everyone gathering around the table, and the taste?
Pure comfort food magic. This recipe is foolproof, restaurant-quality, and perfect for feeding a crowd or meal prepping for the week.
Pair it with classic Filipino sides like garlic rice, atchara (pickled papaya), or steamed vegetables for the full experience. The best part? It’s ready in under an hour, with minimal effort. Let’s get cooking!
Ingredients for baked chicken pinoy
These 13 ingredients transform simple chicken into restaurant-quality Filipino comfort food magic.
| Ingredient | Amount | Notes |
|---|---|---|
| Boneless, Skinless Chicken Thighs 🍗 | 1 ½ lb | Medium-sized, even thickness |
| Soy Sauce 🍶 | ¼ cup | Light or regular, not low-sodium |
| Calamansi Juice 🍋 | ¼ cup | Or substitute lemon juice |
| Banana Ketchup 🍌 | ⅛ cup | Filipino-style, find in Asian markets |
| Garlic Cloves 🧄 | 6 cloves | Minced, fresh for best flavor |
| Olive Oil 🫒 | 2 tbsp | Extra-virgin for richness |
| Parmesan Cheese 🧀 | ½ cup | Freshly grated, block preferred |
| Panko Breadcrumbs 🍞 | ½ cup | For extra crunch |
| All-Purpose Flour 🌾 | ¼ cup | For dredging chicken |
| Salt 🧂 | 1 tsp | Diamond Crystal preferred |
| Black Pepper 🌶️ | ½ tsp | Freshly ground for heat |
| Ground Paprika 🌶️ | ½ tsp | Smoked for depth of flavor |
| Butter 🧈 | 2 tbsp | Melted, unsalted preferred |
The chicken thighs are the star—medium-sized and even thickness ensures perfect cooking. Filipino markets carry the best banana ketchup, but Trader Joe's has a decent substitute. For calamansi, Asian grocery stores sell bottles, or grab a bag of limes and squeeze them—it’s the same tangy magic. The garlic? Freshly minced makes all the difference, so don’t skip this step. If you can’t find smoked paprika, regular paprika plus a pinch of liquid smoke works in a pinch.
No banana ketchup? Mix 1 tbsp tomato paste + 1 tbsp brown sugar + 1 tsp vinegar for a quick substitute. Pre-grated Parmesan gets clumpy—grate it yourself from a block for that perfect texture. The butter matters here—unsalted ensures you control the seasoning. For extra crispiness, broil the chicken for 2-3 minutes at the end. The soy sauce can be swapped for coconut aminos if you’re avoiding sodium, but traditional soy gives that authentic umami punch.
Marinate the chicken for at least 30 minutes, but overnight is best for maximum flavor. The crust keeps for 2 days in the fridge, but freeze it separately if prepping ahead—just bake straight from frozen. Reheat in a 375°F oven for 10-12 minutes until golden. The leftovers? Tastes even better the next day—perfect for meal prep. Store in an airtight container with a paper towel to keep the crust crispy.
Why You'll Love This Recipe
- Here’s what sold me: this tastes just as good cold the next day, making it perfect for packed lunches or quick meals. My kids actually eat their chicken now—no complaints about "boring" food.
- 20-Minute Prep: I swear, this recipe is about as low-effort as it gets—just marinate those chicken thighs in soy sauce, minced garlic, and a splash of calamansi for 10 minutes while you prep the rest. No chopping, no fuss, and honestly? That’s my kind of cooking.
- Tangy-Sweet Magic: Between us, the banana ketchup and calamansi juice combo is chef’s kiss—bright, sticky, and just sweet enough to balance the savory garlic. It’s the kind of flavor that makes you reach for seconds without even thinking.
- Lunchbox Hero: Here’s what sold me: this tastes just as good cold the next day, making it perfect for packed lunches or quick meals. My kids actually eat their chicken now—no complaints about "boring" food.
Step-by-step instructions for crispy parmesan chicken
Here's how to transform simple chicken thighs into restaurant-quality bites with golden crust and tender centers.
👨🍳 Step 1: Marinate for Maximum Flavor
In a large bowl, combine the 0.25 cup soy sauce, 0.25 cup calamansi juice, 0.125 cup banana ketchup, 1 tsp salt, 0.5 tsp black pepper, and 0.5 tsp ground paprika. Whisk until fully dissolved—this marinade is the secret weapon for both flavor and moisture.
Add the 1.5 lb boneless, skinless chicken thighs to the marinade, turning to coat completely. Cover and refrigerate for at least 1 hour (overnight is even better). The acidity from the calamansi and banana ketchup will tenderize the meat while infusing it with rich, savory flavors. You'll notice the chicken absorbs the marinade and develops a beautiful pink hue—this is your first indication the flavors are working their magic.
🍳 Step 2: Create the Crispy Parmesan Coating
Preheat your oven to 400°F and line a baking sheet with parchment paper. In a shallow dish, mix together the 0.25 cup all-purpose flour, 0.5 cup panko breadcrumbs, and 0.5 cup freshly grated parmesan cheese. This combination gives you the perfect balance of structure and flavor—panko for crunch, parmesan for umami depth, and flour as a binder.
Remove the chicken from the marinade (reserve the marinade for basting) and pat it dry with paper towels. This step is crucial—any moisture left on the chicken will prevent the coating from adhering properly. Working in batches, dredge each thigh in the flour mixture, pressing gently to help the coating stick. The coating should look even and well-adhered—no bare spots should remain.
🔥 Step 3: Sear for Extra Crispiness
Heat 2 tbsp olive oil in a large oven-safe skillet over medium-high heat until shimmering. Working in batches to avoid crowding, add the coated chicken thighs and sear for 2-3 minutes per side until golden brown and crispy. This initial sear creates a flavorful crust that will carry through the baking process.
Here's the thing—don't rush this step. You want to see those crusts develop a deep golden color before moving to the oven. If you notice the coating starting to brown too quickly, reduce the heat slightly. Once all pieces are seared, transfer the skillet to the preheated oven.
🔥 Step 4: Bake to Juicy Perfection
Pour the reserved marinade into the skillet with the chicken, then cover tightly with aluminum foil. Bake for 20 minutes, then remove the foil and continue baking for another 10-15 minutes until the internal temperature reaches 165°F and the coating is deeply golden and crispy.
This two-stage baking method is key—covering first helps retain moisture while the chicken cooks through, then uncovering allows the coating to crisp up beautifully. You'll know it's done when the chicken releases easily from the skillet and the crust looks like it's been baked to a perfect golden brown. The juices should run clear when you pierce the thickest part of the thigh.
🍽️ Step 5: Rest and Serve with Garlic Butter
Transfer the chicken to a cutting board and let it rest for 5 minutes before serving. This resting period allows the juices to redistribute, ensuring each bite is moist and flavorful. While the chicken rests, make the garlic butter sauce by melting the 2 tbsp butter in a small saucepan over low heat, then adding the 6 cloves minced garlic and cooking for 30 seconds until fragrant.
Slice the chicken against the grain if desired, then drizzle with the garlic butter sauce. The combination of crispy parmesan crust, juicy centers, and rich garlic butter creates a symphony of flavors that will have everyone asking for seconds. Serve immediately with steamed vegetables or rice to soak up those delicious juices.
Pro Tips For Making Baked Chicken Pinoy
- Marinate Chicken First: The thighs absorb flavors better when marinated for at least 30 minutes—even overnight if you’re planning ahead. I used to skip this, and the sauce just sat on top like a sad, flavorless glaze.
- Use Fresh Calamansi: Store-bought juice lacks the bright tang fresh calamansi brings—squeeze it yourself if possible. If you must use bottled, add a splash of vinegar to mimic the acidity, or the dish will taste flat.
- Bake at 375°F, Not Higher: I learned this after my first batch turned out dry and rubbery—high heat cooks chicken thighs too fast. 375°F gives them time to tenderize without drying out, especially with the banana ketchup’s sugar caramelizing.
- Add Garlic Late: Minced garlic burns fast, and you’ll lose that sweet, nutty aroma if it sits too long in the marinade. Toss it in just before baking, or even sprinkle it on top in the last 10 minutes for maximum punch.
Common mistakes when making perfect results
Skipping the Marinade
Don’t skip marinating—this is where the magic happens! The soy sauce, calamansi, and banana ketchup combo tenderizes the chicken and infuses it with deep, savory flavors. I’ve seen people rush this step and end up with dry, flavorless chicken.
Trust me, at least 1 hour of marinating makes all the difference. If you’re short on time, even 30 minutes helps, but overnight is ideal for maximum flavor. 🌟
Overcrowding the Pan
When searing, it’s tempting to cram all the chicken in the pan at once, but this steams the chicken instead of browning it. Crowding prevents the coating from getting crispy and can lead to uneven cooking.
Work in batches—I usually sear 2-3 pieces at a time—and don’t rush. Patience here ensures that golden, shatteringly crisp crust you’re after. 🔥
Not Drying the Chicken
Wet chicken won’t hold the parmesan-panko coating properly, leading to a messy, uneven crust. Always pat the chicken dry with paper towels after marinating. I’ve made this mistake too—once, I skipped drying and ended up with half the coating falling off during baking.
It’s a quick step, but it’s crucial for that perfect texture. 🧻
Baking Without Foil
Covering the chicken with foil during the first 20 minutes of baking is key to keeping the meat juicy. Without it, the chicken can dry out before the crust forms.
I’ve seen people forget this step, and the result? Dry, tough chicken. The foil traps steam, ensuring tender meat while the crust crisps up in the final uncovered phase. 💫
Overcooking the Chicken
Chicken thighs are forgiving, but overcooking them turns them dry and rubbery. Use a meat thermometer to check for an internal temperature of 165°F. I’ve pulled chicken out too early, only to have it continue cooking off the heat, and it’s a shame to waste perfectly good meat.
The crust will keep cooking even after the chicken reaches temperature, so don’t rush the final minutes. ⏰
Using Pre-Grated Parmesan
Pre-grated parmesan contains anti-caking agents that make it clump and lose its texture. Freshly grated parmesan gives you that perfect, fine crumb that sticks to the chicken beautifully. I always grate my own from a block—it’s worth the extra effort.
If you’re in a pinch, pulse pre-grated parmesan in a food processor for a finer texture, but freshly grated is the gold standard. 🧀
Nutrition facts
Frequently asked questions
Can I use chicken breasts instead of thighs?
Chicken breasts work, but thighs are ideal for this recipe because they stay juicier during baking. If using breasts, cut them horizontally into cutlets (½-inch thick) and reduce baking time to 15-18 minutes total. The marinade time remains the same—at least 1 hour—to prevent dryness.
What can I substitute for banana ketchup?
Mix 1 tbsp tomato paste + 1 tbsp brown sugar + 1 tsp vinegar for a quick substitute. For extra tang, add ½ tsp calamansi juice. This combo mimics banana ketchup’s sweet-savory balance while keeping the Filipino flavor profile.
How do I make this recipe gluten-free?
Replace the flour with ½ cup gluten-free all-purpose flour and use ½ cup gluten-free panko (or crush gluten-free bread into crumbs). The parmesan crust will still crisp up beautifully—just press the coating firmly onto the chicken. Always check labels for hidden gluten in seasonings too.
Can I bake this chicken in an air fryer?
Yes! Preheat the air fryer to 375°F and spray the chicken lightly with oil. Air fry for 12-15 minutes, shaking halfway, until the crust is golden and internal temp reaches 165°F. The air fryer gives a slightly different texture but still delivers great flavor.
Why does my parmesan crust keep falling off?
This usually happens when the chicken isn’t dry enough or the coating isn’t pressed firmly. Pat the chicken very dry with paper towels after marinating, then press the parmesan-panko mixture gently but firmly onto each piece. A light spray of oil before coating helps too.