
Main Courses
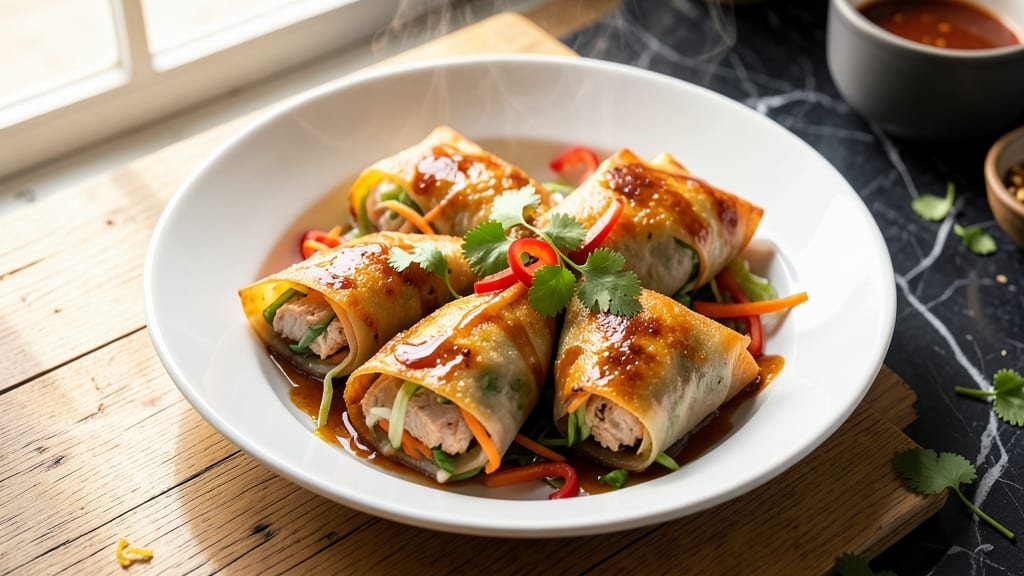
This baked chicken spring roll recipe delivers the same crispy, golden crunch you love from takeout—without deep frying. The secret lies in a clever parchment paper technique that creates a crispy exterior while keeping the filling tender inside.
I developed this method after years of struggling with soggy homemade spring rolls, and it finally cracked the code for restaurant-quality results at home.
The filling combines juicy shredded chicken, fresh vegetables, and aromatic seasonings wrapped in delicate spring roll wrappers. What makes this recipe special is the baking process: we use parchment paper to create crispy, golden edges that mimic deep-fried texture without the mess or guilt.
The result is a lighter version that's just as satisfying.
By the time you're done, you'll have perfectly golden spring rolls with a satisfying crunch that holds up even when sliced. The filling stays moist and flavorful, while the parchment paper creates that addictive crispiness.
This is comfort food at its finest—crispy on the outside, tender on the inside, and packed with flavor.
Serve with sweet chili sauce, peanut dipping sauce, or a tangy hoisin glaze for the full experience. These spring rolls pair beautifully with rice, noodles, or as an appetizer for any gathering. Let's get started on this healthier twist on a classic favorite.
Ingredients for baked chicken spring roll
Fresh veggies, juicy chicken, and crispy parchment magic for takeout-style spring rolls—no deep fryer needed.
| Ingredient | Amount | Notes |
|---|---|---|
| Boneless Chicken Breast 🍗 | 1 ½ lb | Shredded or finely diced |
| Spring Roll Wrappers 🍱 | 12 pieces | Square rice paper wrappers |
| Carrots 🥕 | 1 cup | Julienned or shredded finely |
| Green Cabbage 🥬 | 1 cup | Shredded, thinly sliced |
| Red Bell Pepper 🌶️ | ½ cup | Thinly sliced or julienned |
| Fresh Cilantro 🌿 | ¼ cup | Chopped, stems removed |
| Garlic Cloves 🧄 | 4 cloves | Minced or finely chopped |
| Ginger Root 🌿 | 1 tbsp | Freshly grated |
| Soy Sauce 🍶 | 3 tbsp | Low-sodium preferred |
| Sesame Oil 🫒 | 1 tbsp | For aroma, not cooking |
| Olive Oil 🫒 | 1 tbsp | For brushing wrappers |
| Salt 🧂 | ½ tsp | Kosher or sea salt |
| Black Pepper 🌶️ | ¼ tsp | Freshly ground |
| Parchment Paper 📄 | 1 sheet | Heavy-duty for crisping |
| Sweet Chili Sauce 🍅 | ½ cup | For serving, optional |
The spring roll wrappers are the game-changer here. Rice paper wrappers from Asian markets or the international aisle at Trader Joe's work best—they're thin and pliable. If you can't find them, low-carb tortillas in a pinch, but they won't crisp as well. Look for wrappers that feel slightly waxy but still flexible. The chicken should be shredded fine—rotisserie chicken works perfectly if you're short on time, just drain it well. For the veggies, julienne peeler is your best friend—it takes minutes instead of chopping for hours. Fresh ginger and garlic make all the difference, so don't skip them even if you're tempted to use powdered versions.
No fresh cilantro? Fresh basil or mint works in a pinch, though the flavor will be different. Swapping bell pepper for red onion or jicama keeps things crunchy. The soy sauce can be coconut aminos if soy-free, but traditional soy adds that umami depth. Sesame oil is for aroma only—don't cook with it. If you're worried about the spring rolls getting soggy, pat the filling dry with paper towels before wrapping. For the parchment paper, Kraft brand works best—it's sturdy enough to hold up during baking. The wrappers need a light brush of olive oil before folding, but don't overdo it or they'll get greasy.
Store unassembled filling in airtight containers for 3 days—it keeps well in the fridge. Wrapped spring rolls can be baked fresh or assembled and refrigerated for 24 hours before baking. For leftovers, reheat at 350°F for 10 minutes to restore crispiness. The parchment paper trick means you can freeze assembled rolls for 2 months—just bake straight from frozen, adding 5 minutes to the time. These reheat beautifully and taste even better the second day when flavors meld.
Why You'll Love This Recipe
- Crisp in Minutes: I swear by the oven trick—just brush those spring roll wrappers with oil and a pinch of salt before baking. No frying, no mess, and that golden crunch happens faster than you can say "second helping."
- Savory Crunch Combo: The chicken stays juicy inside while the bell pepper and cabbage caramelize just enough to hit that perfect sweet-spicy balance. Honestly, the first bite makes me forget I’m eating something "healthy."
- Lunchbox Hero: Between us, these are my go-to for packed lunches—no soggy wrappers here. The carrots add a satisfying bite, and the chicken holds up for days. My kids actually eat their veggies this way. (Yes, even on a Tuesday night.)
- Budget Win: Chicken breast and cabbage stretch to feed four for under $10. I’ll be real: the wrappers are the splurge, but they’re worth it when you’re left with zero takeout guilt and maximum flavor.
Step-by-step instructions for crispy baked chicken spring rolls
Here's how to make restaurant-style spring rolls with a satisfying crunch—no deep fryer needed.
Prepare the Chicken Filling
Cut the 1.5 lb boneless chicken breast into small, even pieces—about ¼-inch cubes. This size ensures the chicken cooks through while staying tender. In a large bowl, combine the chicken with the 1 cup shredded green cabbage, 1 cup julienned carrots, 0.5 cup thinly sliced red bell pepper, 0.25 cup chopped fresh cilantro, 4 minced garlic cloves, and 1 tbsp freshly grated ginger root. Stir gently to distribute the vegetables evenly.
In a small bowl, mix the 3 tbsp soy sauce, 0.5 tsp salt, and 0.25 tsp black pepper. Pour this over the chicken mixture and toss until everything is well coated. Let it sit for 10 minutes—this allows the flavors to meld and the chicken to absorb the seasoning. You'll notice the cabbage wilting slightly and the chicken becoming more opaque as it begins to tenderize.
Assemble the Spring Rolls
Fill a large shallow dish with warm water—just enough to cover the bottom. Dip one spring roll wrapper at a time into the water for 5-10 seconds until pliable but not soggy. I like to hold it with tongs to avoid burning my fingers. Lay the wrapper flat on a clean surface and place 2-3 tablespoons of the chicken filling near the bottom corner.
Fold the bottom corner over the filling, then fold in the sides, and finally roll tightly from the bottom up, tucking in the edges as you go. You'll want a neat, compact roll—this ensures even cooking and a clean bite. Place the finished spring roll seam-side down on a plate lined with a clean kitchen towel to prevent sticking. Repeat with the remaining wrappers and filling, keeping them covered with the towel until ready to bake.
Bake for Crispy Perfection
Preheat your oven to 375°F and line a baking sheet with the parchment paper. Arrange the spring rolls on the sheet, leaving about ½ inch of space between each one. Brush the tops lightly with the 1 tbsp olive oil—this helps create a golden, crispy exterior. For extra flavor, drizzle with 1 tbsp sesame oil and sprinkle with a pinch of salt.
Bake for 20-25 minutes until the spring rolls are golden brown and the parchment paper is crispy. You'll know they're done when the edges are firm and the filling looks heated through. If they brown too quickly, tent with foil to prevent over-browning. Let them cool for 5 minutes before serving—this helps the parchment crisp up even more.
Serve with Sweet Chili Sauce
Use a sharp knife to carefully cut the spring rolls into bite-sized pieces, being mindful of the crispy parchment. Serve immediately with the 0.5 cup sweet chili sauce on the side for dipping. The contrast of the sweet, tangy sauce with the savory filling and crispy parchment makes every bite irresistible. Enjoy while warm for the best texture!
Pro Tips For Making Baked Chicken Spring Roll
- USE A MIXED BATTER: Baked spring rolls need grip without sogginess—whisk 1 egg with 2 tablespoons cold water and 1 tablespoon cornstarch, then brush it lightly on the inside of each wrapper before filling. The egg sets the edges, while the cornstarch keeps the filling from leaking. (Yes, even if you’re in a hurry—this is the thing that actually holds them together.)
- SLICE CHICKEN THIN: Cut the boneless breast into paper-thin strips (¼-inch or less) against the grain—thicker pieces stay rubbery even after baking. If you’re impatient like me, freeze the chicken for 15 minutes first; it slices cleaner and cooks faster. Trust me, nobody wants a chewy spring roll.
- STACK WRAPPERS TIGHT: Layer your filled spring rolls vertically (like a log) on a parchment-lined tray, tucking the edges tightly under. This prevents them from unraveling during baking and ensures even browning. Pro move: Brush the tops with a little oil before baking—they’ll crisp up like takeout.
- BAKE IN TWO STAGES: Start at 400°F (200°C) for 12 minutes to set the filling, then drop to 350°F (175°C) for another 10–12 minutes. The high heat seals the edges, while the lower temp finishes them without burning. Overlooking this? Your rolls will either be raw inside or crispy to a crisp. (I learned this after a very sad batch.)
Regional styles of these flavors
Vietnamese Bánh Chả Giò
In Vietnam, these spring rolls are called bánh chả giò, and they’re traditionally filled with pork, shrimp, or chicken mixed with mushrooms and wood ear fungi. The filling is often seasoned with fish sauce, black pepper, and a touch of sugar for balance.
I love using rotisserie chicken here for convenience, but traditional recipes call for ground pork mixed with shredded chicken. The wrappers are dipped in water, then wrapped tightly to ensure a clean bite. 🌶️
For an authentic touch, add ½ cup shredded wood ear mushrooms and ¼ cup finely chopped scallions to the filling. The mushrooms soak up flavors beautifully, while the scallions add a fresh, oniony bite.
Serve with a side of nuoc cham (Vietnamese dipping sauce) made with fish sauce, lime juice, sugar, and water. This tangy, sweet sauce cuts through the richness of the filling perfectly.
Chinese Crispy Spring Rolls
In Chinese cuisine, these are often called chun juan or crispy spring rolls, and they’re a staple in dim sum and takeout menus. The filling typically includes shredded pork, shrimp, and water chestnuts for extra crunch.
I swap the chicken for ground pork and add ½ cup julienned water chestnuts for texture. The wrappers are brushed with egg wash before frying, but in this baked version, we rely on the parchment paper trick. 🥢
For a Chinese-inspired twist, add 1 tbsp hoisin sauce to the filling and garnish with crushed peanuts before baking. Serve with duck sauce or plum sauce for dipping.
The hoisin adds a deep, savory note, while the peanuts give a delightful crunch. This variation is especially popular in Cantonese cuisine and pairs well with steamed rice.
Thai Crispy Spring Rolls
Thai-style spring rolls, or por Pia Tod, often feature a mix of chicken, pork, and glass noodles for a chewy texture. The filling is seasoned with Thai basil, garlic, and a hint of chili for heat.
I keep the chicken but add ½ cup cooked glass noodles and 2 tbsp chopped Thai basil to the mix. The glass noodles add a fun, chewy element that’s characteristic of Thai street food. 🌿
For an authentic Thai flavor, add 1 tsp chili flakes and 1 tbsp fish sauce to the filling. Serve with a side of nam jim (Thai chili sauce) or a sweet and sour dipping sauce made with tamarind paste, palm sugar, and lime.
The heat and sweetness balance the savory filling beautifully. These spring rolls are perfect for spice lovers and pair well with coconut rice.
Americanized Fusion Style
In the US, spring rolls have been adapted with local ingredients, like bacon or sausage instead of pork, and sometimes even ground beef. I like using Italian sausage for a fusion twist—just crumble ½ lb cooked sausage into the filling.
Add ¼ cup grated Parmesan cheese for a cheesy, umami kick. This version is great for those who love bold, hearty flavors. 🍕
For a true Americanized touch, serve with marinara sauce or ranch dressing for dipping. The sausage adds richness, while the Parmesan gives a satisfying cheesiness. This variation works well as an appetizer for game day or a fun twist on classic spring rolls.
It’s a crowd-pleaser that bridges the gap between Asian and Western tastes.
Nutrition facts
Frequently asked questions
Why does the parchment paper make my spring rolls crispy?
The parchment paper creates crispy edges through a simple science trick! When you bake the spring rolls directly on parchment, the edges dry out and crisp up while the filling stays moist. The paper also helps distribute heat evenly, preventing soggy centers. This method mimics deep-frying's crispy texture without the oil.
Can I use regular tortillas instead of spring roll wrappers?
You can try, but the results won't be the same. Spring roll wrappers are thin and delicate, designed to crisp perfectly. Low-carb tortillas might work in a pinch, but they'll be thicker and less crispy. For best results, stick with traditional rice paper wrappers—they're the secret to that authentic texture.
How do I prevent the filling from leaking while baking? Tightly rolling the spring rolls is key!
What's the best way to reheat leftover spring rolls?
Reheat at 350°F for 10 minutes on a baking sheet with fresh parchment paper. This restores the crispy texture without making them soggy. For microwave reheating, cover with a damp paper towel and heat for 20-30 seconds, but the texture won't be as crisp. Always reheat quickly to maintain that satisfying crunch.
Can I make these spring rolls ahead of time?
Yes! Assemble the spring rolls and store them in the fridge for up to 24 hours before baking. For longer storage, freeze uncooked rolls for 2 months—just bake straight from frozen, adding 5 extra minutes. The filling can even be prepped 3 days ahead and stored in airtight containers. This makes meal prep a breeze!